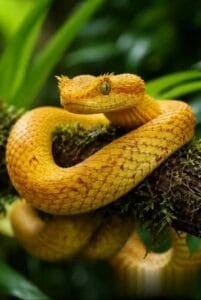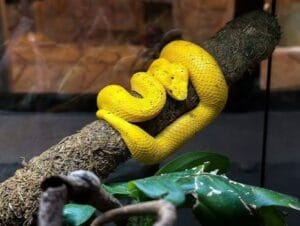
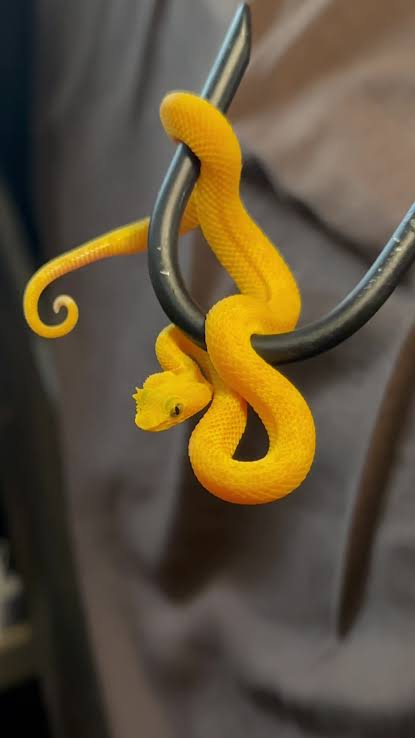
The first time I had to move my eyelash viper, I was terrified.
She was in her enclosure, coiled on a branch, watching me with those golden eyes and ridiculous “eyelashes.” I had a snake hook in one hand and a shift box in the other. My heart was pounding. My hands were shaking.
I’d watched every video. Read every care sheet. Practiced on non-venomous snakes for months. But nothing prepared me for the reality of reaching into an enclosure with a venomous snake inside.
That was five years ago. Today, moving eyelash vipers is routine. Not because I’m careless — never because I’m careless — but because I’ve developed a system. The right tools, the right techniques, and the right mindset.
If you’re keeping eyelash vipers — or thinking about it — this guide covers everything I’ve learned about safe handling. The tools, the methods, and the mistakes that could cost you a finger.
Why Eyelash Viper Handling Hooks Are Non-Negotiable
Let me be clear about something: you do not handle eyelash vipers with your hands. Ever.
These are venomous pit vipers. Their bite causes severe pain, swelling, tissue damage, and potentially permanent injury. It’s not worth the risk. It’s never worth the risk.
That’s where eyelash viper handling hooks come in. A snake hook is a simple tool — a long handle with a curved hook at the end — that allows you to manipulate a snake without putting your hands anywhere near its head.
For eyelash vipers specifically, hooks are essential because:
- They’re arboreal (they live on branches, not the ground)
- They’re small (easy to manipulate with a hook)
- They’re defensive (they’ll strike if they feel threatened)
- They have a long strike range relative to their body size
A good hook gives you distance. Distance gives you safety. Safety keeps you in the hobby long enough to actually enjoy these incredible snakes.
The Eyelash Viper Handling Tools I Use
Here’s my complete toolkit for working with venomous snakes:
1. Snake Hooks (24-32 inches)
This is the most important tool you’ll own. For eyelash vipers, I recommend a hook that’s at least 24 inches long. This gives you enough distance to stay out of strike range while still maintaining control.
What to Look For:
- Lightweight but sturdy construction
- A smooth, non-abrasive hook surface
- A comfortable grip
- A hook that’s appropriately sized for small arboreal vipers
How I Use It:
I use the hook to gently lift the snake’s body — never the head — when I need to move them. For eyelash vipers, I’ll usually hook the middle of their body and let them coil onto the hook naturally.
2. Shift Boxes
A shift box is exactly what it sounds like — a box used to “shift” a snake from one place to another. It’s a secure container with a locking lid that you guide the snake into.
What to Look For:
- Locking lid (non-negotiable)
- Clear plastic (so you can see the snake)
- Proper ventilation holes
- Appropriate size for your snake
How I Use It:
I place the shift box near the snake, use the hook to guide them toward it, and close the lid once they’re inside. Then I can move the box safely without touching the snake directly.
3. Snake Tubes
A snake tube is a clear plastic tube that a snake crawls into. Once the snake is inside, you can safely examine or transport them without risk of a bite.
What to Look For:
- Clear plastic (so you can see the snake)
- Smooth interior (so the snake can’t turn around)
- Appropriate diameter (snug but not tight)
- Secure end caps
How I Use It:
I place the tube near the snake and let them crawl in on their own. Once they’re inside, I can cap the ends and handle the tube safely.
4. Transport Containers
If you need to take your eyelash viper to the vet — or move them to a new enclosure — you need a secure transport container.
What to Look For:
- Locking lid (non-negotiable)
- Escape-proof design
- Proper ventilation
- Dark, secure interior (reduces stress)
- Label clearly marked “VENOMOUS SNAKE”
How I Use It:
I transfer the snake from their enclosure to the transport container using a hook and shift box. Then I seal the container, double-check the locks, and place it in a secondary container for transport.
5. Feeding Tongs (12+ inches)
Feeding tongs are for feeding — nothing else. They allow you to offer prey items without getting your hands near the snake.
What to Look For:
- Long enough to keep your hands safe (12+ inches)
- Non-slip grip
- Sturdy construction
How I Use It:
I use tongs to dangle prey items near the snake’s perch. I never use my hands. I never use short tongs. I never get complacent.
My Step-by-Step Protocol for Moving an Eyelash Viper
Moving an eyelash viper is a process. Here’s exactly what I do:
Step 1: Assess the Situation
Before I even open the enclosure, I locate the snake and assess their mood. Are they coiled calmly? Are they alert and watching me? Are they in a defensive posture?
This determines how I approach the move.
Step 2: Gather Your Tools
I make sure I have everything I need within reach:
- Snake hook
- Shift box (or transport container)
- Feeding tongs (if needed)
- A clear workspace
I never start a move without all tools ready. The last thing you want is to realize you forgot something while a venomous snake is halfway out of their enclosure.
Step 3: Open the Enclosure Slowly
Slow, deliberate movements. No sudden gestures. I open the enclosure door just enough to work — not fully, unless necessary.
Step 4: Locate the Snake
I visually confirm the snake’s position. With arboreal vipers, they’re usually on a branch or coiled near the top of the enclosure. If they’re hiding, I wait or adjust my approach.
Step 5: Make Contact with the Hook
I use the hook to gently touch the snake’s body — not the head. This lets them know I’m there and gives them a chance to react. Most eyelash vipers will either hold still or slowly move away.
Step 6: Guide, Don’t Force
I use the hook to guide the snake toward the shift box or transport container. I never try to force them. I work with their natural movements, not against them.
Step 7: Secure the Snake
Once the snake is in the shift box or container, I close the lid immediately and lock it. I don’t leave the container open for even a second.
Step 8: Double-Check Everything
Before I move anything, I verify:
- The lid is locked
- There are no gaps
- The container is secure
- The snake is fully inside
Step 9: Complete the Move
I move the container to its destination, open it carefully, and use the hook to guide the snake out. Then I close the enclosure and verify the snake is secure.
This process takes maybe five minutes. But those five minutes require total focus. No distractions. No phone. No conversation. Just you and the snake.
Mistakes I Made Early On (And How to Avoid Them)
Mistake 1: Using a Hook That Was Too Short
I started with a 12-inch hook because it felt more precise. Big mistake. That put my hand way too close to the strike range of an arboreal viper.
Fix: Use a hook that’s at least 24 inches. Longer is better. You can always adjust your grip, but you can’t add length.
Mistake 2: Moving Too Fast
Venomous snakes don’t respond well to sudden movements. I learned this the hard way when I moved too quickly and my viper struck at the hook — and nearly connected with my hand.
Fix: Slow down. Every movement should be deliberate and controlled. If you feel rushed, stop and reset.
Mistake 3: Getting Complacent
After a few successful moves, I started to feel confident. Too confident. I stopped double-checking locks. I stopped verifying the snake’s position before opening the enclosure.
Fix: Treat every interaction like it’s your first. Complacency kills.
Mistake 4: Working Alone
For the first year, I did everything alone. If I’d been bitten, no one would have known until it was too late.
Fix: Always have someone else present when working with venomous snakes. Even if they’re just in the next room, knowing they can call for help makes a difference.
Mistake 5: No Bite Protocol
I didn’t have a plan for what to do if I got bitten. I just assumed it wouldn’t happen. That’s how people die.
Fix: Have a written bite protocol. Know the nearest hospital. Know what information to give medical staff. Keep your snake’s species information readily available.
What to Do If You Get Bitten by an Eyelash Viper
This is the part nobody wants to think about. But you need to.
Eyelash viper venom is hemotoxic — it destroys tissue, causes massive swelling, and can lead to permanent damage. It’s rarely fatal to healthy adults, but it’s always a medical emergency.
My Bite Protocol
- Stay calm. Easier said than done, but panic makes everything worse.
- Move away from the snake. Secure the snake if possible, but prioritize getting to safety.
- Remove jewelry and tight clothing. Swelling happens fast.
- Keep the bitten limb still and below heart level. This slows venom spread.
- Call 911 or have someone drive you to the hospital. Don’t drive yourself if you can avoid it.
- Do NOT:
- Cut the wound
- Try to suck out venom
- Apply a tourniquet
- Apply ice
- Drink alcohol
- Take painkillers that thin blood
- At the hospital: Tell them you were bitten by an eyelash viper (Bothriechis schlegelii). They need to know the species to determine if antivenom is needed.
Why Captive Bred Snakes Are Easier to Work With
This is one of the biggest reasons I recommend captive bred eyelash vipers over wild-caught ones. Captive bred snakes are:
- Accustomed to human presence (from a distance)
- Less defensive
- More predictable
- Less likely to strike without warning
- Better established and healthier overall
This doesn’t mean captive bred eyelash vipers are safe to handle — they’re still venomous, still unpredictable, still capable of biting. But they’re generally calmer and easier to work with than wild-caught animals.
Here’s what’s currently available at nightfallreptiles.com:
| Morph | Price | Temperament |
|---|---|---|
| Christmas Tree Eyelash Viper | $510 | Calm, established |
| Golden Eyelash Viper | $510 | Calm, established |
Both are captive bred, feeding consistently, and shipping nationwide to legal states.
Christmas Tree Eyelash Viper – $510 – Captive Bred – Nightfall Reptiles
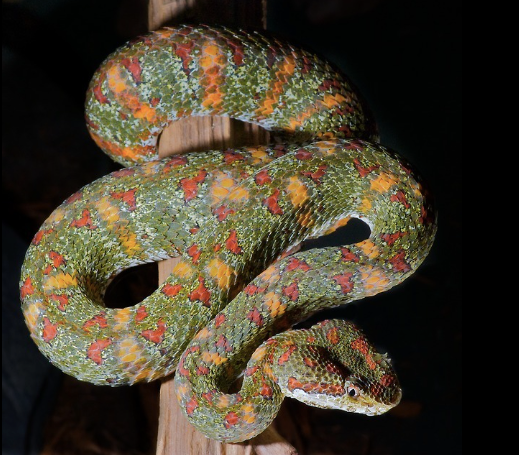
Christmas Tree Eyelash Viper For Sale
Bothriechis schlegeliiCaptive BredMale and Female AvailableApproximately 18 – 24 Inches In LengthAdults Will Grow To About 2 Feet In LengthFeeding On Frozen Thawed Or Live Adult Mice*These Are Venomous. Please Know Your State Laws Before Inquiring As Some States Require Venomous Permits*
100 in stock
Golden Eyelash Viper – $510 – Captive Bred – Nightfall Reptiles
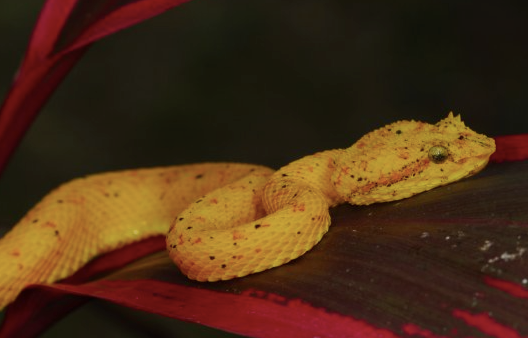
Golden Eyelash Viper For Sale
Bothriechis schlegeliiCaptive BredApproximately 18 – 24 Inches In LengthAdults Will Grow To About 2 Feet In LengthFeeding On Frozen Thawed Or Live Adult Mice*These Are Venomous. Please Know Your State Laws Before Inquiring As Some States Require Venomous Permits*
100 in stock
Starting with a calmer snake makes the learning curve less steep — and safer.
Building Your Eyelash Viper Handling Skills
Nobody starts out good at this. It takes practice, patience, and respect for the animals.
How I Built My Skills
- Practiced on non-venomous snakes first. I used hooks and shift boxes on corn snakes and ball pythons before I ever touched a venomous snake.
- Observed experienced keepers. I watched how they moved, how they positioned their tools, how they stayed calm under pressure.
- Started slow. My first few moves took 20+ minutes. I was slow, deliberate, and overly cautious. That’s how it should be.
- Never stopped learning. Even now, I watch videos, read books, and talk to other keepers. There’s always something new to learn.
Final Thoughts on Eyelash Viper Handling Hooks and Safety
Using eyelash viper handling hooks isn’t about being brave. It’s about being smart. It’s about respecting the animal in front of you and recognizing that one mistake can change your life.
The tools matter. The techniques matter. But the mindset matters most.
Stay calm. Stay focused. Stay humble.
And never, ever get complacent.
I’ve been keeping venomous snakes for five years now, and I still follow the same protocols I developed in month one. Every time. No exceptions.
Because the day you start cutting corners is the day you get bitten.
Ready to add an eyelash viper to your collection?
Check out the Christmas Tree Eyelash Viper and Golden Eyelash Viper available now at nightfallreptiles.com. Both are captive bred, established, and shipping nationwide.
Got questions about eyelash viper handling or these specific animals? Drop a comment below or hit us up — I’m always down to help fellow keepers.
FAQs
What size hook do I need for an eyelash viper?
I recommend a hook that’s at least 24 inches long. Longer is better for keeping distance. For arboreal vipers, a 24-32 inch hook works well.
Can I handle my eyelash viper with my hands?
Absolutely not. Eyelash vipers are venomous and should never be handled with bare hands. Always use appropriate tools like hooks and shift boxes.
What is a shift box?
A shift box is a secure container with a locking lid used to move venomous snakes safely. You guide the snake into the box using a hook, then close and lock the lid.
How often do I need to move my eyelash viper?
Only when necessary — enclosure cleaning, health checks, or transport. Don’t move them just for the sake of it. Every interaction is stressful for the snake.
Are captive bred eyelash vipers easier to handle?
They’re generally calmer and less defensive than wild-caught snakes, but they’re still venomous and unpredictable. The same safety protocols apply.
What should I do if I get bitten by an eyelash viper?
Stay calm, remove jewelry, keep the bitten limb below heart level, and get to a hospital immediately. Do not try to suck out venom or apply a tourniquet.
Disclaimer: This article is based on my personal experience with eyelash viper handling hooks and venomous snake safety. It is not a substitute for professional training or veterinary advice. Venomous snake keeping is regulated in many areas — check your local laws before purchasing.